Heureux possesseur d'un Hackintosh depuis de longues années, il m'a fallu le mettre à jour dernièrement afin de profiter des nouvelles fonctionnalités apportées par Big Sur.
Auparavant en Catalina, j'utilisais Clover comme bootloader. Sauf qu'à partir de Big Sur, il est conseillé d'utiliser OpenCore, qui est un poil moins userfriendly. Le gros avantage, c'est que ce bootloader arrive avec une doc très complète. Il m'a quand même fallu presque une journée pour avoir une configuration correcte de mon bootloader, qui m'a permis de booter du premier coup sur une install toute neuve de Big Sur.
Inventaire
Pour commencer, il faut avoir fait un inventaire très précis de son matériel. Chez moi :
- carte mère Gigabyte GA-Z87X-UD3H (carte son ALC898, carte réseau Intel i217),
- carte wifi broadcom BCM43xx vue comme une carte AirPort Extreme et ne nécessitant donc pas de pilote spécifique,
- carte graphique gigabyte Radeon RX 580 ne nécessitant pas de pilotes spécifique
Paramétrage du Bios/UEFI
Ensuite, il faut vérifier le paramétrage de son Bios/UEFI :
- désactiver le fast boot,
- désactiver le secure boot,
- désactiver les ports série/parallèle,
- désactiver le VT-d
- désactiver le thunderbolt (pendant l'install),
- désactiver l'Intel SGX,
- désactiver Intel platform trust,
- désactiver le CFG Lock
- activer VT-x,
- activer Hyper threading,
- activer execute disable bit,
- activer EHCI/XHCI Hand-Off
- activer le mode other OS (si Windows 8 proposé),
- activer le mode SATA AHCI
Dans mon cas, il faut aussi activer la carte graphique physique comme premier périphérique d'affichage (et donc désactiver l'affichage intégré au CPU, le iGPU).
Outils nécessaires
On va utiliser quelques outils :
- Homebrew qui va installer notamment les outils XCode (git),
- gibMacOS qui permet de télécharger des sources d'installation de MacOS, sans accès à l'Apple Store,
- MountEFI qui permet de monter facilement des partitions de type EFI,
- OpenCore qui sera le BootLoader de notre système,
- ProperTree qui nous permettra d'éditer graphiquement notre fichier de configuration principal (config.plist),
- GenSMBIOS qui va nous permettre de générer des identifiants pour notre faux mac
Installation de Homebrew
L'intérêt d'installer Homebrew est que cela va installer les outils dont on peut avoir besoin pour développer/gérer du code (xCode notamment).
jihefge@Rubato ~ % /bin/bash -c "$(curl -fsSL https://raw.githubusercontent.com/Homebrew/install/HEAD/install.sh)"
==> Checking for `sudo` access (which may request your password)...
Password:
==> This script will install:
/usr/local/bin/brew
/usr/local/share/doc/homebrew
/usr/local/share/man/man1/brew.1
/usr/local/share/zsh/site-functions/_brew
/usr/local/etc/bash_completion.d/brew
/usr/local/Homebrew
==> The following existing directories will be made group writable:
/usr/local/sbin
==> The following existing directories will have their owner set to jeffetflo:
/usr/local/sbin
==> The following existing directories will have their group set to admin:
/usr/local/sbin
==> The following new directories will be created:
/usr/local/bin
/usr/local/etc
/usr/local/include
/usr/local/lib
/usr/local/share
/usr/local/var
/usr/local/opt
/usr/local/share/zsh
/usr/local/share/zsh/site-functions
/usr/local/var/homebrew
/usr/local/var/homebrew/linked
/usr/local/Cellar
/usr/local/Caskroom
/usr/local/Frameworks
==> The Xcode Command Line Tools will be installed.

Press RETURN to continue or any other key to abort:
Cela installe automatiquement les utilitaires XCode (cela peut prendre un peu de temps car les sources sont assez volumineuses).
Software Update Tool

Finding available software

Downloading Command Line Tools for Xcode
Downloaded Command Line Tools for Xcode
Installing Command Line Tools for Xcode
Done with Command Line Tools for Xcode
Done.
==> /usr/bin/sudo /bin/rm -f /tmp/.com.apple.dt.CommandLineTools.installondemand.in-progress
==> /usr/bin/sudo /usr/bin/xcode-select --switch /Library/Developer/CommandLineTools
==> Downloading and installing Homebrew...`

==> Tapping homebrew/core
remote: Enumerating objects: 1124185, done.
remote: Counting objects: 100% (13/13), done.
remote: Compressing objects: 100% (10/10), done.
remote: Total 1124185 (delta 5), reused 9 (delta 3), pack-reused 1124172
Receiving objects: 100% (1124185/1124185), 436.14 MiB | 5.58 MiB/s, done.
Resolving deltas: 100% (775629/775629), done.
From https://github.com/Homebrew/homebrew-core
 * [new branch]              master     -> origin/master
Updating files: 100% (6238/6238), done.
HEAD is now at 8024aa93656 libmodbus: update 3.1.7 bottle.
==> Downloading https://ghcr.io/v2/homebrew/portable-ruby/portable-ruby/blobs/sha256:0cb1cc7af109437fe0e020c9f3b7b95c3c709b140bde9f991ad2c1433496dd42
############################################################################################################################################## 100.0%
==> Pouring portable-ruby-2.6.8.yosemite.bottle.tar.gz
==> Installation successful!

==> Homebrew has enabled anonymous aggregate formulae and cask analytics.
Read the analytics documentation (and how to opt-out) here:
  https://docs.brew.sh/Analytics
No analytics data has been sent yet (nor will any be during this install run).

==> Homebrew is run entirely by unpaid volunteers. Please consider donating:
  https://github.com/Homebrew/brew#donations

==> Next steps:
- Run brew help to get started
- Further documentation:
    https://docs.brew.sh
Récupération des sources de MacOS
On installe gibMacOS avec git clone
jihefge@Rubato ~ % mkdir /Users/jihefge/hackintosh
jihefge@Rubato ~ % cd /Users/jihefge/hackintosh
jihefge@Rubato hackintosh % git clone https://github.com/corpnewt/gibMacOS
Cloning into 'gibMacOS'...
remote: Enumerating objects: 567, done.
remote: Counting objects: 100% (35/35), done.
remote: Compressing objects: 100% (29/29), done.
remote: Total 567 (delta 16), reused 16 (delta 6), pack-reused 532
Receiving objects: 100% (567/567), 685.22 KiB | 222.00 KiB/s, done.
Resolving deltas: 100% (349/349), done.
jihefge@Rubato hackintosh % ls -l
total 0
drwxr-xr-x  12 jihefge  staff  384 10 jan 20:54 gibMacOS
jihefge@Rubato hackintosh % cd gibMacOS
jihefge@Rubato gibMacOS % chmod +x gibMacOS.command
jihefge@Rubato gibMacOS % ./gibMacOS.command
#######################################################
\# Downloading Catalog #
#######################################################
Currently downloading publicrelease catalog from
https://swscan.apple.com/content/catalogs/others/index-10.15-10.14-10.13-10.12-10.11-10.10-10.9-mountainlion-lion-snowleopard-leopard.merged-1.sucatalog
Downloaded 6.80 MB of 6.80 MB (100.00%)
#######################################################
\# gibMacOS #
#######################################################
Available Products:
1. macOS Monterey 12.1 (21C52)
- 002-42435 - Added 2022-01-14 18:42:59 - 12.16 GB
2. macOS Big Sur 11.6.1 (20G224)
- 002-23589 - Added 2021-12-01 21:44:37 - 12.43 GB
...
18. macOS Mojave 10.14.5 (18F2059)
- 061-26578 - Added 2019-10-14 20:38:26 - 6.52 GB
M. Change Max-OS Version (Currently 10.15)
C. Change Catalog (Currently publicrelease)
I. Only Print URLs (Currently False)
S. Set Current Catalog to SoftwareUpdate Catalog
L. Clear SoftwareUpdate Catalog
R. Toggle Recovery-Only (Currently Off)
U. Show Catalog URL
Q. Quit
Please select an option: 2
```bash
On télécharge la version qui nous intéresse en tapant son numéro de ligne (ici 2)
Le téléchargement commence alors
```bash
#######################################################
\# Downloading File 3 of 6 #
#######################################################
MajorOSInfo.pkg --> Succeeded
InstallInfo.plist --> Succeeded
Downloading InstallAssistant.pkg for 002-23589 - 11.6.1 macOS Big Sur... #######################################################
# Downloaded 6 of 6 #
#######################################################
Succeeded:
MajorOSInfo.pkg
InstallInfo.plist
InstallAssistant.pkg
UpdateBrain.zip
BuildManifest.plist
Info.plist
Failed:
None
Files saved to:
/Users/jihefge/hackintosh/gibMacOS/macOS Downloads/publicrelease/002-23589 - 11.6.1 macOS Big Sur
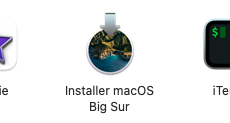
Press [enter] to return...Lorsque le téléchargement est fini, il faut lancer le fichier installassistant.pkg que l'on vient de télécharger (il se trouve dans le dossier indiqué par la commande ci-dessus). Celui-ci va ajouter le programme "Installer MacOS Big Sur" dans le dossier Applications.

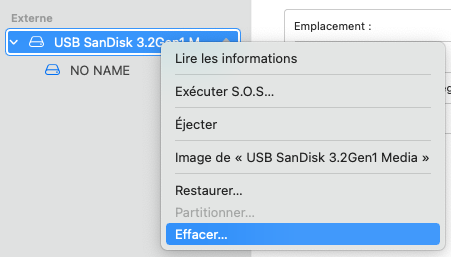
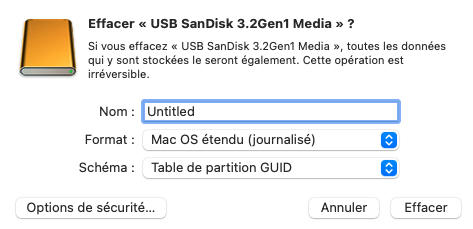
Avec l'utilitaire de disque, on formate une clé USB en GUID partititon map, avec un FS MacOS Extended (journalisé) et avec le nom Untitled.


On lance ensuite la création de la clé USB bootable avec la commande : sudo /Applications/Install\ macOS\ Big\ Sur.app/Contents/Resources/createinstallmedia --volume /Volumes/Untitled
jihefge@Rubato ~ % sudo /Applications/Install\ macOS\ Big\ Sur.app/Contents/Resources/createinstallmedia --volume /Volumes/Untitled
Password:
Ready to start.
To continue we need to erase the volume at /Volumes/Untitled.
If you wish to continue type (Y) then press return: y
Erasing disk: 0%... 10%... 20%... 30%... 100%
Copying to disk: 0%... 10%... 20%... 30%... 40%... 50%... 60%... 70%... 80%... 90%... 100%
Making disk bootable...
Install media now available at "/Volumes/Install macOS Big Sur"